Showing posts with label Recipes. Show all posts

RECIPE: Inexpensive Freezer Burritos


I saw a recent statistic about how much more groceries cost right now than they did just a year or two ago (seriously...let's NOT discuss the reasons here ;-) ). The increase was absolutely staggering!

Anyone else feeling a bit of a pinch at the grocery store lately? Maybe this should be our new "me too" movement haha

Anyway - I thought I'd share a money saving tip that I pulled out of my past...I used to make a giant batch of these every month or two when we were single income family with 4 kids, and didn't know where the milk money was going to come from. FREEZER BURRITOS!

After shopping, I did some basic math...These end up being about $1.50 for the chicken burritos and about $1.00 for the bean burritos (with my store prices - might vary a bit for you). Not bad!

Whip up a batch for a quick and easy meal any time :-)

Burritos are pretty self-explanatory, but if you like a recipe, here you go:

Makes 8 bean and cheese burritos AND 16 chicken and cheese burritos  = 24 TOTAL burritos

Ingredients:
- 24 burrito size flour tortillas
- 8 oz can of black beans, drained and rinsed
- Nutritional Yeast (optional)
- 28 oz can of refried beans
- 1 bag (2.5 lbs) of frozen chicken breasts or tenders 
- 1 jar of your favorite salsa - I used a 16 oz jar of Medium Pace chunky salsa
- approx 1.4 lb of cheddar cheese - shred
- parchment paper
- Gallon ziplock style bags - you'll need 3

**I didn't do rice in these, but I will next time!  Feel free to experiment with whatever you think would be yummy in a burrito :-) 

Instructions:
1. Toss a bag of frozen chicken in the instapot and cook for an hour. If you don't have a pressure cooker, just cook the chicken however you like. Make sure it's cooked thoroughly.
2. Once cooked, dump a jar of salsa in with the chicken. Heat and stir to dice/shred the chicken and simmer until water is cooked off.
3. To save money and avoid that weird powdery stuff in pre-shredded cheese, I buy chunks of cheese and shred either by hand or in a food processor. While the chicken cooks, shred the cheese.
4. Time to assemble! I do in batches of 8 at a time for simplicity.
- Set out 8 tortillas
- add a dollop of refried beans and spread off-center for easy rolling later
- top with black beans, nutritional yeast, and cheese (bean burritos)
- top with chicken and cheese (chicken burritos)
- roll tightly and wrap with parchment
- store 8 burritos per gallon bag and freeze

To Cook:
1. Pop the burrito (still in parchment) in microwave to defrost
2. If you like a soft burrito, cook another couple minutes in micro
3. If you like a crunchy edge like me, unroll the burrito and place the burrito on the parchment in the oven at 375 for 10 minutes or so
4. I like to serve with a dollop of sour cream, salsa, and greens

** HOT! be careful! You are in real danger of burning your lips right OFF YOUR FACE if you don't let it cool before digging in!

Enjoy! :-)

Read more...

Hello, Summer! (recipe and an update)

Welcome, Summer.....it seems I've been waiting forever for you!


Popsicles
Sprinklers
Little giggles
Cool breezes
The smell of sunscreen
Sleeping in (a little)
Throwing the ball for the dogs
Flowers in bloom
and FLIP FLOPS!  Oh, how I love flip flops!!

(all pictures taken with my iPhone and the Instagram app - look me up on Instagram!  my user name is daiquirifouch)


One of my favorite things about summer is the FOOD.  Our garden is in (our Mother's Day tradition):


And WOW, I can't believe how much the garden has grown in just the couple of weeks since I took this picture!

I can hardly wait for tomatoes still warm from the sun, fresh basil plucked from the pot, a bit of mozzarella cheese and a drizzle of oil and vinegar!  It's what I live on all summer!

But that's not the recipe I planned to share.  In fact, the summer dish I've been craving isn't something I can take credit for.  I'm thinking about orzo pasta with asparagus, cherry tomatoes, and fresh basil.  You can find the recipe here (I substitute basil for parsley):  Lemon Orzo Salad at "ABig Mouthful.com" (how fun is that web name?!) :-)  I think I might try this recipe with quinoa instead of orzo too...a bit of extra protein....what do you think?  


This summer got started right with an INCREDIBLE spring ....when I learned that I'd qualified for an all-expenses-paid trip to Sonoma and San Francisco for 5 days!  I got to meet our Doctors, tour the Corporate Offices, go to the spa, give wine tasting a try, and more -- unreal!  I blogged about it at my "Skin, Beautiful Skin" blog, if you'd like to see more pics:  "Big Time Perks"  But I can't NOT share one of my favorite pictures here.....I got to meet the doctors who changed my skin and my life!


And finally....big Fouch family news....Sammy lost her first front tooth!  She's impossibly cute with her sweet little missing-tooth-lisp!


Be blessed, friends!!

Read more...

Content with a Capital "C"

I'm still alive - promise!  Wow, I've been a terribly unfaithful blogger lately!  Some days I feel like I'm too busy living life to take a break and write about it, ya know?

I have big news.  To say it, it doesn't sound nearly as overwhelmingly joyful as it feels.....just two little words.  But there's no other way to put it:  I'm content.

Did you hear me?  I'm CONTENT.

This is a revolutionary change for me.  I can't remember a time in my life that I wasn't striving for the next thing that life would bring.  I was in high school, I was looking forward to college.  I was single, I was looking forward to finding "him".  I found "him", and I was looking forward to being married.  I was married, and I was looking forward to having children.  I was in college, and I was looking forward to working.  I was working, and I was looking forward to quitting and being a mom.  I was a mom, and I was looking forward to....well, the kids' bedtime!

Do you know what I mean?  Always pressing and pushing and wishing I was somewhere I wasn't.

But now?  I'm here.  I'm happy.  I'm full.

I'm sharing my life with my favorite person in the world.
My life is filled with the joyful chaos of my happy and healthy children.
I have friends I love.
I have this Jesus of mine who holds my hand and comforts me...encourages me everywhere I go.
I have work to do that feels like a little bit of something for *me*....but that I can do without taking away from the parts of my life that belong to my family.

I'm loving my life, and I just can't tell you how good that feels....way down deep in my soul.

Ironically, the best change in my life  - the thing that's finally brought me to this miraculous place of contentment is something I've fought against my entire life:  the giving up of control.

Hello world, my name is Daiquiri and I'm a control freak. (this is not news to the people who know me best)

Also in the "ironic" column, is the fact that the thing that brought me to the place where I had no choice but to loosen my iron grip on control is something I never dreamed I'd do.  May it never be said that God doesn't have a sense of humor!

In short, it's my business that's changed my life so dramatically.

You know how it's said that there's never an atheist in a foxhole?  It makes sense.  If you're hiding in a hole in the ground while bullets whiz by your head....if you have no where to turn and no control over what's about to happen to you?  Most people in that extreme situation with call out to God for help, even if they've denied His existence their entire lives.

Well, with this business, I find myself waking up every single morning in my own personal foxhole!

I wake with this big dream before me....and the realization that I am utterly without the ability to make my dream reality.  So I turn to Him, offer my dream up into His hands, and say something like "If this isn't what you have for me, then change my heart's dream.  If it is, then you're gonna have to guide me because I don't know what the hell I'm doing!"

I give control of my day to Him....and then spend my time trying my best to listen and to find the courage to move when He tells me to move.

At first it was terrifying, but now?  Well now, I never want that control back again!  Truly amazing things happen when the Spirit is given free reign in a person's life...in short, the path is made clear for miracles to happen!

Is everything in my life perfect?  No way.  There are lots of things in my life that I'd change right now if I could do it with a snap of my fingers.  But I can't.  And the One who can?  Well, He's not snapping those fingers....and I trust Him.  I am precisely where He wants me, and so I will rest.

That, my friends, is an amazing feeling.

So that's what's been up with me :-)

That, and a whole bunch of practical stuff like:
1.  We FINALLY closed on that house we flipped!  YIPPEE!! (that reminds me, I still have lots of before and after shots to get up on that blog)

2.  Spring Break with the kids was awesome - the perfect combo of lounging in jammies all day and watching cartoons....and running all over town to explore the Discovery Center, Nature Center, parks, and watch movies.  Our kids are at such great ages right now!

3.  My sister and her family are MOVING.  To CALIFORNIA.  Personally, I'm crushed.  We'll miss them like crazy, and I'm sorta grumpy with them for making my girls cry every night because they're already missing their cousins.  But for them?  I'm really excited for them and proud of them for chasing their life long dreams.  They have tons of courage, and I hope they find exactly what they're after.  And hey, now we have a good excuse to visit Lego Land sooner rather than later ;-)

4.  One of my best friends in the whole world has written a book!  She has a gorgeous new website, and I'm so happy for her!

5.  Clara's hands are only one knuckle away from being the same size as mine.  This is totally freaking me out.

6.  I got an iPhone, and I simply don't know how I ever lived without it!

7.  My first full month of business was December - I sold a little product that month and was pretty excited about it.  But now?  My little organization has 17 people in it, and we cover 6 states.  Now I'm REALLY excited about it!

8.  I'm headed to, of all places, Bozeman, Montana this weekend for my first corporate event.  I'm not sure I'll sleep at all between now and Friday because I'm so stinkin' excited!  I LOVE this job!

9.  Thomas is talking like crazy, and I am so enjoying getting to know what's going on in his little head.  By the way, he is super smart!  Who knew?!

10.  Clara is finally reading like a champ...took lots of slamming doors and foot stomping to finally get here, but we're here.  Praise.  The.  Lord.

11.  My sweet little Samantha is registered for kindergarten this coming fall.  Oh my.  Bloggy friends....count on being a shoulder for me while I mourn her leaving me every morning.

12.  Thomas is signed up for preschool.  That means I'll have 5 hours each week all to myself.  After a solid 10 years of happily having someone under-foot at all times.  Can't really let myself think about that right now.

13.  Ben is signed up to play soccer starting in a couple of weeks.  He's my "I hate change" kiddo, so I'm very proud of him for trying something new.

And finally, if you can believe it, the reason I decided to sit and write tonight (besides the fact that Luke is out of town right now and I'm missing the adult conversation)....I made a fun and super easy treat for the kids tonight.  It was so yummy that it earned me a "you're my favorite person in the whole wide world, mommy" from Sammy :-)


To make:
- Melt chocolate chips in the micro at about 30% power, stirring every 30 seconds until smooth (Nestle chips are the best)
- skewer a large marshmallow with a straight pretzel, and dip in chocolate.  place on waxed paper to cool.
-  with remaining chocolate: mix coconut and crushed graham crackers.  drop onto waxed paper to cool.  
(hint: don't crush crackers to fine - the small chunks make for a nice crunch)

Finally, get your camera ready to capture the smiles that are sure to follow :-)

Read more...

Cool Gift & Yummy Treat

As you know, Luke and I celebrated our 13th wedding anniversary last month.  Luke's dad is an incredible woodworker, and he gave us the neatest gift!  Check it out...it's a manual coffee grinder!  That little section with the floral embellishment opens - dump some beans in there, close the door, and turn the crank.  The ground coffee drops into a little glass bowl contained in the bottom drawer.  How neat, eh?!


He even engraved it with our names, some hearts, and the date of our anniversary.  This will be a treasure forever - thanks, Jim!


With coffee on the brain, I thought I'd share a delicious coffee-complimenting banana bread recipe I found this summer (I tweaked it a bit to suit my taste...what is with me?  why can't I just follow a recipe?).  Note that the proportions of crumb topping to banana bread are roughly 50/50.  LOVE it.  The crumb topping is one of my Ben's favorite treats.  I always make a little extra so he can just eat some with a spoon :-)


**MAKES TWO LOAVES!**

Ingredients:
1 cup flour
1/2 cup whole wheat flour
1 cup sugar
1 1/2 tsp baking powder
1/2 cup shortening
2 eggs
1 cup milk
1 tsp vanilla
1 tsp cinnamon 
1 (I often use 2) ripe, mashed banana

(topping):
1/2 cup four
1/4 cup whole wheat flour
1/2 cup packed brown sugar
1 cup quick-cooking oatmeal
1/2 tsp cinnamon
1/2 cup chilled butter

Directions:
1.  Preheat oven to 350 degrees F.  Spray bread pan with non-stick spray.
2.  Whisk flours, sugar, and baking powder in a large mixing bowl.  Cut in the shortening until the mixture resembles coarse crumbs.  
3.  In a separate bowl, whisk eggs, milk, vanilla, and cinnamon.  Add the banana and mix well.  
4.  Fold the flour mixture into the banana mixture until well combined.  Pour into bread pan
5.  Crumb topping:  combine flours, sugar, oats, and cinnamon in large bowl.  Cut in the butter until the mixture resembles coarse crumbs.  Spoon the crumb mixture over the batter.
6.  Bake for approximately 30 minutes.  Test with a toothpick inserted in center of the loaf - remove from oven if the toothpick comes out clean.  If not, bake for another 5-10 minutes and check again.  Remove when toothpick comes out clean.  Let cool in pan for 15 minutes, then turn out to a wire rack.

Read more...

::Recipe:: Homemade Maple Syrup

We go through syrup like it's the air we breathe.  Crazy!

It's not that syrup is very expensive (at leas the imitation not-really-maple-anything syrup that I buy), but it is loaded with high fructose corn syrup.  While the recent ads might be telling the truth when they say that high fructose corn syrup is fine in moderation...the kind of consumption that we've been averaging wouldn't be considered "moderation" by any definition of the word.

So...I decided to try and make my own.  It's loaded with sugar.  It's loaded with calories.  And...it's delicious.  I make a batch each weekend, refill the old plastic syrup bottle that is the last remaining remnant of the store-bought stuff we used to use, and the kids go through it by the next weekend.

I made an interesting observation since switching to the homemade stuff.  One of the complaints I've heard regarding HFCS is that it somehow inhibits our ability to get the "I'm full" signal from our stomach (or brains?  I don't know).  I'm no scientist, but I can say with certainty that there's a more satisfied feeling in the belly after eating a stack of flapjacks coated in the real stuff vs. the HFCS version.

And, even though the kids adore the new syrup, their consumption of pancakes is down quite a bit.  Are they just past a growth spurt, or are their bellies and brains finally able to come to the conclusion that they're full after 5 pancakes instead of 10?  I don't really know...I just know the syrup is YUM-O.

Here's the recipe I use:

1 cup brown sugar
1 cup white sugar
1 cup water
1 tsp mapeline (or other maple flavor concentrate, found in the spice isle)
1 tsp vanilla
1/2 tsp cream of tartar (supposed to help prevent crystallization)

Combine all ingredients in a saucepan, whisk together, and heat over med-high heat until boiling.  Reduce heat to medium and boil for 5 minutes.  Reduce heat to low and keep warm for another 5 minutes.  Remove from heat and let cool completely before transferring to container.  Can be stored at room temp or in the fridge.

PS.  One of the things I've always disliked about homemade syrups is how water thin they are.  This recipe yields a nice thick syrup.  Enjoy!

Read more...

Totally Blog-Worthy

We have bloggy lingo at our house. Every now and then, something happens and one of us looks at the other and says something like, "Now THAT'S blog worthy!"

This is one of those things (just dug it out of Ben's school folder):


Thank you Lord, for my wonderful almost 8 year old boy.

And for scanners.

Read more...

Recipe: Delicious Cheesy Tomato Sandwiches


Does this picture speak for itself?  I don't think so.  They look amazing...they taste even better.  Let me know how you like them :-)


PS.  Thanks to my sweet friend Erin for this great recipe

Read more...

Recipe: Cranberry Chicken


I got this recipe from my friend, Becky.  It's become a family favorite around here, and it's SUPER easy and fast to make.

Here's what you'll need:
1.  chicken
2.  french dressing - one bottle
3.  dry onion soup mix - one packet
4.  canned cranberries - I like the whole cranberries best, but the jellied makes a smoother sauce that the kids prefer.

- Toss 3-4 frozen or fresh (I always do frozen) chicken breasts into an oven safe pan.
- Combine all the other three ingredients in a bowl and stir until combined
- Pour mixture over chicken
- Bake in a 350 oven until the chicken is cooked through (takes around an hour and 15 minutes for frozen chicken)
-  You can leave the chicken in large pieces, but I like to chop it into roughly 1" squares for easier serving.
-  Serve with parmesan couscous and veggies.  
- Watch in amazement as your normally picky eaters gobble this up!

*If I'm in a hurry because I didn't start dinner until 5 (which hardly EVER happens, ahem), I'll turn the oven up to 375, and it works just fine.

Read more...

Homemade French Bread


We're having a blast with my hubby's brothers and their families here this week.  At times, it's been chaotic and loud and stressful....but not nearly as often as it's been pure joy to see our children playing and giggling together, and just flat out FUN chatting and laughing in to the night with these wonderful people who I call "family".  Truly - this is the stuff that memories are made of!

One night, I decided to keep it simple and just make spaghetti for dinner.  My mom makes a mean homemade spaghetti sauce, and that's what was on my menu (I'll see if she minds me sharing that recipe with you).  To my dismay, I realized that I had everything I needed for dinner...except the french bread.

No problem...I'll just make some!  Ahem - so much for my simple dinner plans!  I had no idea how time consuming it was to make bread.

As it turns out though, I also had no idea how FUN it would be (and how lousy the store-bought stuff is by comparison!).

Look at those beautiful loaves of crusty french bread!  I MADE those! Yahoo!  Felt like a major miracle :-)

I lucked out with the recipe, I think. I sat down and Googled "french bread recipe", and landed HERE.  Click on over, grab the recipe, and try it yourself.  You won't be disappointed!

Read more...

Recipe: Freezer Burritos

Looking for a way to stock your feezer with easy to prepare, nutritious (and delicious) meals?  Make a big batch of my Freezer Burritos, and you'll be set for quick and easy lunches (or dinner if you'd like) for months!


PS.  Do you have a favorite freezer meal?  Please share...


Read more...

Goin' eHow Crazy (gingersnaps & handling a bully)


Seriously, are you sick of the phrase "I wrote another article" on this blog yet?  I sort of am!  I just love eHow though - it totally appeals to the OCD in me...that tidy list of articles all sorted and organized and easy to print.  Purrrr ;-)


So...I wrote another article.  Two actually.   The first is a recipe for those amazing cookies up there (thanks to my good friend Michele), and the second is about helping your school-aged child deal with bullying.  

It was just a few months ago that Ben sort of casually announced "there's a bully at my school".  After a brief conversation, I realized that it was MY boy who was being bullied. 

LET ME AT THAT PUNK!

But then I realized that this was an opportunity.  I taught Ben how to handle the bully, and now Ben (and his friends) seem to be immune to little Mr. Tough Guy.  And my boy?  His confidence shot through the roof.  It was a joy to see.

Anyway...here are those articles if you're interested.  As always, I appreciate your rating and recommendations :-)


Read more...

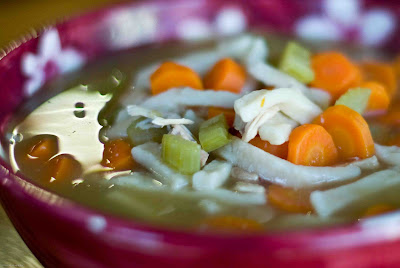
Recipe: Homemade Chicken Noodle Soup

Comfort.
Healing.
Love.
Warmth.
Wholesome Goodness.

Few foods can bring all of these thoughts to mind quite the way that a giant pot of homemade chicken noodle soup does.  

Well now...who knew I had it in me?  Hallmark, if you're looking for a new greeting card writer, I just might be your gal.  Drop me a line and we'll work out the details.

I recently made a pot of my mom's chicken soup for my family, and it was a hit (as always).  On the off chance that you're still getting snow and rain days mixed in with your sunny and 60 degrees days (like we are here in Idaho), I thought I'd share this wonderful recipe.  Choose a particularly chilly or grey day to make this - you'll be surprised by how it warms your home and tummy.

(when you get to the article, click "print article"...and I'd really appreciate it if you'd rate the article too!)

Ingredients:
1 whole chicken
1-2 lbs carrots
1 bunch celery
water and/or low sodium chicken broth
chicken bullion
Reame's frozen egg noodles, 16 oz (or noodles of your choice)
thyme
pepper
garlic salt
Johnny's seasoning salt

Instructions:
~ Rinse and chop the celery.  Peel and chop the carrots.  How coarsely or finely you chop the veggies is entirely up to you.  They'll be cooking for quite a while though, so I recommend leaving them a little chunky to avoid mushy veggies.


~ Place entire chicken, carrots, celery, and 2-3 chicken bullion cubes in a large stock pot.  Fill with water to cover the chicken.  I typically defrost the bird and remove the stuff from the cavity, but this last time I made it I didn't.  I put the whole frozen chicken right in the pot and crossed my fingers.  Turned out just fine.


~Boil until the chicken begins to fall away from the bone.  This will take an hour or two depending on the size of the chicken and if it was frozen or thawed.

~ Turn off the heat and remove the chicken from the pot.  Let the chicken cool until you can work with it without burning your fingers.  I sometimes put it in the fridge or freezer to cool quickly.

Have you ever noticed just how undignified a whole plucked chicken looks?  I feel like I need to avert my eyes or put a towel over it or something.


See here?  The meat starting to come off the bone here is an indicator that this bird is cooked.


~  Remove some of the fat from the pot.  You can either use a spoon and skim it off, or


...you can use one of these cool things.  It's called a "fat separator", and you should be able to find one at any kitchen store worth it's salt.


Use a large spoon to skim off the top layer of soup, and pour it in the fat separator.  Let it sit on the counter for a few minutes.  You'll see the fat rise to the top.


Then, pour slowly back into the pot.  The fat is at the top, but the spout pours from the bottom.  You end up pouring the broth back into the pot, but leaving the fat in the separator ready to be tossed.  Genius!  Stop pouring if  fat or that icky brown stuff starts to make it's way back into your soup.  I usually repeat this process a few times until there is very little fat left.
 

~ Add some seasoning to the pot.  I typically season, taste, season, taste, etc.   Let's see, I probably put about a tsp. of thyme and pepper, and about 2 tsp. of the Johnny's and garlic salt.  If in doubt, leave the soup a little on the bland side.  It can always be salted and peppered at the table.


~Remove the chicken from the bone, chop, and return to pot.


If you're doing this right, the neighborhood dogs will start to howl for a taste, and  your dogs will sit in the kitchen and stare at you like this:

~If the liquid seems too low, add more water or a couple of cans of low sodium chicken broth.  

~Bring the pot to boiling (very important with these noodles).  Add the frozen noodles and return to a boil. Cook until the noodles are cooked through and no longer have a frozen or chewy center.  


~ Serve it up and watch 'em devour it!  We enjoy ours with lots of crackers and sharp cheddar slices on the side.  Pat yourself on the back for making such an inexpensive yet delicious and nutritious meal.  Write to me and tell me how much you loved it :)


Read more...

Play Dough Fun

As I was vacuuming today, I had to stop and scrape some play dough from the dining room rug.  It dawned on me...just how many times I've heard friends mention that they don't let their kids play with the squishy stuff very often because they're afraid of the mess.  


So, for the sake of those sad non play dough playing children everywhere, I decided to publish an eHow article describing my simple, cheap, and very effective method for removing play dough from carpeting.  I threw in my homemade play dough recipe just for kicks :)

Play dough...there's nothing like it for my kids.  It keeps them busy with fun and creative play for hours on end (especially if we throw in a few polly pocket dolls or those little plastic farm animals).  Let 'em play!  The mess is worth it...and it really isn't all that tough to clean up.

Here are those articles:


PS.  If you're gonna go over there to check them out, please (pretty please with sugar on top) take a second to rate the article for me :)

Now head back to That Family for more WFMW hints and tips.  See you next week!

Read more...

Recipe: Homemade Guacamole

UPDATE:  For a printer-friendly version of this recipe click HERE

I'm an addict.  I could (and sometimes do) eat guacamole every single day for lunch.  Over the past few obsessive months, I've developed my favorite way to make this yummy dip.  

First, you'll need to gather all the necessary ingredients.  You'll need:

1 Tbs lime juice
1 large avocado
1/2 tsp salt
1/3 cup fresh salsa
Your favorite tortilla chips
Your favorite drink.  Diet Coke is optional, but highly recommended.
- If you use a small avocado, then use only about half the measurements of the other ingredients.  Except the Diet Coke.  Especially not the Diet Coke.

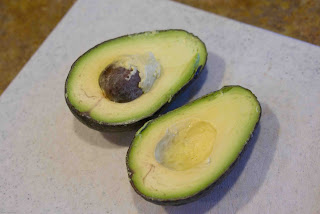
Wait, I need to back up a bit.  If you're anything like me, you weren't born with the knowledge of how to choose a good avocado.  You want it to be ripe.  A ripe avocado will feel a bit soft (will "yield to gentle pressure" as they say in all the fancy recipe books), but it will NOT feel mushy.  If it feels mushy it's either terribly bruised or over-ripe.  You also do not want an avocado to be too hard.  


Okay, now you're ready to make some guac!  First, PLEASE wash the avocado thoroughly with a squirt of soap and plenty of water.  In fact, do this to all of your fruits and veggies before cutting or eating them.  Just think of all the sneezing people who have walked by that food in the store....or have used their dirty mitts to see if that avocado will "yield to gentle pressure".  Ick.  You simply must wash it. 

Okay, NOW you're ready to make guacamole.  Find the stem of the avocado, and start your cut there.  Cut down until you feel your knife hit the pit, and then rotate the avocado to cut through the flesh of the fruit (veggie?) but around the pit.  Don't try to cut straight through the pit.  It will not work out well for you.
 

Separate the two halves, and use a spoon to scoop out the green/yellow insides. 


The next step is to simply use the edge of your spoon to "chop" the avocado into small chunks (or big chunks if you like it chunky).  How many times do you think I can use the word "chunk" this paragraph?  I'm up to 4 so far.  By the way, having your guacamole chunky or not chunky will result in the same thing if you eat too much of it...chunky thighs. And do you know what's really delicious after a meal of chunky (or non-chunky) guacamole for lunch?  A big chunk of dark chocolate.  A big chunk of dark chocolate is good after every meal though, so I guess that point was rather irrelevant.  But it enabled me to use the word "chunk" a couple more times.  Chunkity doo da, chunkity day.  My oh my what a chunky day.  Okay...15.  That should do it.

Excuse me while I run and grab something to eat for breakfast, I think I'm having blood sugar issues.

Okay.  I'm over it.  Sorry.  Some days I just can't resist.  Can you imagine how my husband feels having to live with me?!

Here you are, dicing up the avocado to the consistency that you like:


Now it's just a matter of dumping in the rest of the ingredients, and mixing it up.  The lime juice:


The salt:


The salsa.  By the way, fresh salsa is the most tasty, but any old salsa will do:


Now put the baby down for a nap, grab the chips, and pop open the Diet Coke.  Enjoy!


Read more...

Trying Something New

Looking for a printer friendly version of a recipe or tip you find here? Well, do I have a deal for you! I just learned that I can write articles for eHow (an internet "how to" site). It's all set up for easy printing (click "print article" under the introduction paragraph) . Plus...it's a great place to go to just see my "how to" stuff if you'd rather avoid my random thoughts and ramblings :)

I just got started, so it's pretty sparse right now. But to see what I've written on eHow, click HERE. You'll find the same old picture of the same old me...and a list of my "articles".

I hope to get all of my recipes and "how to" posts published over there too. That way, when you're looking for something (hopefully) you'll be able to find a printer friendly version there (instead of printing reams of paper from this not so printer friendly blog format).

What did the world ever do without the internet?! :)

Read more...

Adventures In Spaghetti Squash

A good friend of our recently gave us some beautiful pumpkins and spaghetti squash. I just love the fall colors sitting on my kitchen counter! As much as I was enjoying looking at them though, I just had to give one a try.

My friend warned me that the spaghetti squash is a bit tough to open. He said they get sort of a hard shell over time, and we might need a hatchet or something to get it open.

Of course, I didn't really believe him and had to try with the knife first. Sure enough...the guy knows what he's talking about.

So I hunted around the shed and garage for a hatchet. No luck. Hmmm... what do do? And then I saw this sitting in the garage:


Oh yes, I did!

When Ben saw me walk into the kitchen carrying this thing, he said, "Mom! What the?! You gotta be kidding me!" Oh, the phrases they pick up in the first grade. But then?

"Where's the camera, Mom?" That's my boy.

I managed to cut the top off with a knife (and much grunting and groaning and begging and pleading and almost chopping my finger off). So I put it flat side down on a cutting board and then picked up my "hatchet".

Oooo, this is gonna be fun!


CLEAR!


Okay, got the thing stuck in the squash.


Now, I'll just lift the whole thing like this, and smash it down...

Got it!


From there I was able to open it up with a knife. Amazingly, all my fingers were intact at the end!


Scoop out the gunk and seeds with a spoon.


Brush a little olive oil on it, and bake it in the oven for about 30 minutes. My friend said to do it at 350, but I did it at 400 because I had a casserole going at the same time (and it needed 400). Worked out just fine.

The edges browned a bit, and it was tender when I poked it with a fork.


And next, we can see why it's called a spaghetti squash. Look at how this stuff comes out! So fun!


I took my friend's recommendation (see I can listen to instructions), and added some cinnamon and brown sugar.


Unfortunately, the sugar and cinnamon didn't fool my kids. They all took one bite because I told them it would be sweet...but it didn't take them long to realize that "this ain't candy". They couldn't be persuaded to take another bite.


In fact, they went to some pretty creative lengths to hide the fact that they weren't eating it.


Oh well. It was really fun to make...when else can I use an axe to make "spaghetti"?

Read more...


  © Blogger template Shush by Ourblogtemplates.com 2009

Back to TOP