Showing posts with label Fix It Friday. Show all posts

Sweet Baby Girl Fix it Friday

It's not as if I don't have my own pictures to edit, print, and share.  And yet, I find myself sitting here tinkering with someone else's photo this fix-it-Friday!  It's no wonder I don't get anything done...I'm so distracted by every bright shiny thing that comes my way :-)

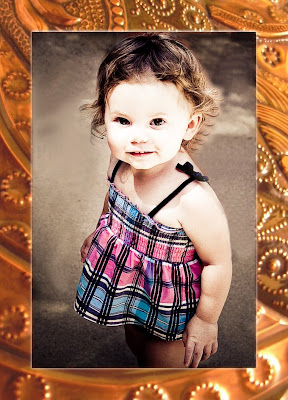
Here's I ♥ Faces "before" photo this week.  It's a cute shot of this adorable little girl, but the mom says she was low on light and she doesn't like the distracting background.  Clearly, there's also a bit of a color cast.


My first step (as always) was to open in Lightroom.  I couldn't quite get the color right, so I switched to b&w, which had the added benefit of knocking out some of the distracting background.  I also did a quick skin soften, and then I did my favorite part...enhanced the eyes.  Eyes just make or break a portrait, don't you think?  Stay tuned - I think I'm going to start writing some tutorials on making eyes pop (and even adding missing catch lights!).

Finally, I popped over to PSE to remove a few little distractions and to have some fun with one of Jerry's masks.  Good grief, I'm crazy about this artist.  Go see him at Shadowhouse Creations - tell him he's wonderful and that I sent you :-)


Read more...

Friday Fix

I'm awfully thankful for this slow and uneventful day after the excitement of this week.  How can a few days stretch on for what seems to be roughly 247.3 years?  Oi.

They're doing their normal Friday Fix over at I ♥ Faces.  Here's the before shot:


And here's my fix:


(I'm loving my new way of making those beautiful browns sparkle a bit.  Using Lightroom, I zoom waaaay in and use the brush tool to up the exposure (just a tad) in the iris.  I leave the dark ring around the iris and the pupil as is.  It's a quick way to increase the contrast so the details in browns eyes pop.)

Have a great weekend everyone.  Squeeze those babies!

Read more...

Fix it Friday

Hello, my name is Daiquiri, and I'm a photography junkie. I love all things photography. Photography gear (especially Nikon - I really really REALLY want this camera), photo software (Lightroom and PS Elements are my favorites), Rangefinder magazine (which you can get FREE), amazingly talented photography friends, and most of all...beautiful images that capture a little slice of time for us to keep forever.

The problem is that not every image is beautiful. There's something just a *little* off....it's not quite the perfect capture of the moment we'd hoped for...the setting on the camera wasn't quite right...etc.

This image is a perfect example. It's a great shot - excellent composition, very sharp, interesting perspective. But...just a little flat. It's a bit too dark, and those beautiful brown eyes get lost. It just doesn't have that magical sparkle that makes you catch your breath and whisper "wow" when you see it.


Enter...photo editing. Did I mention that I love this stuff?

I love this stuff.

Here's the image after I played with it a bit in Lightroom, and removed a few distractions in PSE. I considered taking the snow off her hat because it tends to grab my eye, but I decided to leave it since it adds to the feel of the moment captured.

Check out her amazing eyes!


Do you have any photographs that you love, but that you're just a tad disappointed in? Images that are special to you, but that need a little help?

Well, I'm here to help.

I'm now offering Photo Editing and Restoration services as part of my business. Drop me a line or give me a call if you'd like pricing info.
Ahem...I might even do a couple of images for you for FREE since I'm trying to expand my portfolio in these new areas...I said might...that means maybe...(wink,wink) ;-)

Hop on over to I ♥ faces for more fix it fun today. Thanks for stopping by!


Read more...

Fix it Friday


UPDATE: Sorry for re-posting, just couldn't resist cleaning it up a bit more and adding a texture. My final edit is at the very bottom.

I haven't participated in I ♥ Faces in a while, and this one looked fun :-)

Before:
This one was a bit trickier than I expected. This little sweet-pea has fair skin and red lips (in the pic, at least) - if not adjusted just right, she has a tendency to look a little....creepy ;-)

After cropping to an 8x10 and adjusting the lighting in Lightroom:


In PS Elements, I got rid of some stray hairs and a distracting white section in the middle of the green. If I had more time, I'd even out the whole background and maybe add some texture.


Before and after:


Final Fix:


Read more...

Beautiful Brown Organic Eggs, Anyone?

I've been enjoying my very own photo "fix it" project this morning. One of my wonderfully talented family members has started an organic egg business, and he posted this photo on his Facebook page. I, of course, just couldn't resist putting my touches on it :-)

Here's the before picture:


Here's my edit:


What fun, eh? Don't you just want to grab one of those beautiful eggs and cook it up?

If you're anywhere near Royal, Arkansas then you're in luck! Here's the contact info for the farm:

Nubbin Ridge Farm
1913 Nubbin Ridge Road
Royal, Arkansas 71968
phone: 501-802-3660

Give him a call and tell him Daiquiri sent you :-)

Read more...

Fix it Friday

I haven't been taking the time for Fix it Friday lately, but how could I pass this up? Look at this gorgeous child and beautiful shot!


I didn't do a whole heck of a lot. Cropped it a bit, brightened it up, boosted contrast a tad, and sharpened the eyes. Here's my after:


I also really like this one in black and white:


Just for kicks, I popped it into one of my holiday cards - I think it was made for it!


Happy Friday everyone! Thanks for stopping by - don't forget to go see everyone else's "fixes" over at I &heart; Faces :-)

PS. If you want to see more of my cards, click HERE.

Read more...

Sweet Little Fix it Friday

I've been so busy lately, I've been choosing to not participate in FIF...but this one, I just couldn't resist!  How sweet is this little lady?!  Here's the before shot:


And here are my fixes...

My first pass looks like this - I cropped, rotated, sharpened, and did some lighting stuff all in Lightroom.  Then I brought it over to PSE to do the rounded corners.


Then I decided to try my hand with overlaying some textures.  This first one has sort of a soft, vintage feel to it:


This one has that same texture, but with an added texture to give it a little more of an aged look.  

I'm not sure about those textures quite yet.  I just love the look of a sharp and bright photo.  Maybe they'll grow on me...

Read more...

Friday Fixins

Here's this Friday's adorable "before" shot:


I started in LightRoom, and cropped to an 8x10 aspect ratio.  I also sharpened, brightened, and tweaked to get the following three results.  I did some blemish removal and added the frame in PS Elements.

Fix 1~ Standard Fix


Fix #2~ Blown-out Fix (a little higher in the brights and exposure) - made the eyes really pop, I thought


Fix #3~ Classic BW - I think this one is my favorite this time.  The eyes just really sparkle in black and white!


Thanks for stopping by.  Head over to I ♥ Faces for more Friday Fixins :-)

Read more...

Friday Fun

Here's today's Fix it Friday photo from I ♥ faces.  

It's a sweet image.  I was conflicted about what do do with the hands - leave them or no?  I'm all for documenting the entire child...I LOVE little fingers and toes and ringlets and earlobes.  But in this image, I kept finding myself wondering "WHAT is she doing with her hands?"  For that reason, I decided to crop them out this time.  It was just too distracting for me.


So I focused in on the face - took out a little fuzzy here and there, removed the green/blue rainbow from across her forehead and hairline, and brightened up the eyes and teeth a bit.  As usual, I did most of the work in Lightroom, with just a few finishing touches in PS Elements.

Now go check out what the other contributors did! (that's half the fun, you know)

Read more...

Friday Fixin'

It's Fix it Friday over at I ♥ Faces (anyone else THRILLED that it's Friday?).  Go check out the other contributions.  Here's mine:


This before shot...wasn't quite right to me, but the problem wasn't immediately apparent to me.  This was one that I just tinkered with until I got it "right" to me.  

I started in Lightroom to crop, tilt, and increase the exposure, brightness, and sharpness.  Then I headed to Photoshop to add the border.


A shot that started out as just medium, I can suddenly visualize blown up on a big canvas in this little beauty's room.  What do you think?


Read more...

More Fix It Fun

We're fixin' photos over at I ♥ Faces again this Friday.  Have I mentioned how much I love this?  Yeah, only about 50 times :)

Here's the awesome before shot:
 

Here's my fix:


It didn't need much, that's for sure!  I did everything in Lightroom 2 - crop, straighten, white balance, brighten.  Done.

I had a conversation with "my" camera guy the other day.  He likes to show me his album of recent shots - he's good.  Really good.  Every now and then he mentions something he'd do differently, and I say something like "You could tweak that in processing".  He rolls his eyes and clicks his tongue at me.  "No processing for me.  Photography isn't about the computer."

I feel a bit like I've been scolded.

There are the purists, to be sure ("get it right the first time, and NO processing") - they often even express a feeling that we're somehow "cheating" by messing with images the way we do these days.  I wonder...why do they shoot digital then?  Why not stick with film?

 I don't see the difference between doing the magic in the dark room (film days) versus doing it on the computer now.  

What do you think?


Read more...

More Fix it Friday Fun

I do believe I'm hooked.  The before and after...it sucks me in every time!  Here's the Fix it Friday image for this week (go se I ♥ Faces for more info):


It's a nice image - a little too close for my taste (cut off his chin a bit) and underexposed...or at least too dark in the face, but pop it into a program, and you can do magic.

I went with the BW because as I was playing, it seemed the best method for getting his amazing eyes to pop.  I did everything in Light Room 2 (LOVE this program!).  Here's my "Fix":


I've been playing with PhotoShop - did you know that you can "liquify" a face, and turn a frown into a slight smile?  Incredible!  If I didn't have a pizza in the oven as I type, I might take the time and play with that (maybe after the kids go to bed?).

Thanks for stopping by!

Read more...

More Fix it Friday Fun

I just love "Fix it Friday" over at I ♥ Faces. I just can't resist a good "before and after". Here's the sweet little before shot:


Beautiful little guy in beautiful surroundings - love this. I especially love his chubby little fingers and sweet curls.

I started in Lightroom where I cropped, and adjusted the levels (blacks and contrast were too low for my taste). I also decided to add a slight vignette and to desaturate the entire image a bit to give it more of an antique look. I like how his features pop just a little bit more now:


Then I went to PS Elements, where I added a pattern layer to give it a little bit of a textured canvas look - I'm so into textures lately. I also added a couple of different frames. Which version do you like better? What would you have done differently?


Read more...

Fix It Friday #2

Well, it's Friday again (hallelujah)...so I thought I'd give the "Fix it Friday" challenge a try again (you can find it at i ♥ faces).

Here's the "Before" picture - in my opinion, the biggest problem with this photo is all the distraction in the background.


Of the edits I did, here's my favorite "after" shot.  Cropped, added a vintage process, and a vignette in Light Room.  Then went to PS Elements for the cloning out of the clutter and a funky frame.


PS.  Before settling on the cloning tool to remove clutter in the background, I tried to select the little girl to just eliminate the background all together so I could replace it with something else.

I'm not happy with the "cut" though (looks way unnatural) - Please....anyone have a good trick for isolating a subject to crop them from the background? This isn't the first time I've struggled with this, especially when dealing with hair. Help me out!


Read more...

My 1st "Fix It Friday"

I'm loving a new (to me) blog called i ♥ faces.  If you enjoy photography, even remotely, you simply must go over there and poke around.  They have so much great info and fun projects...I'm totally and completely hooked!

One fun project they have is "Fix it Fridays" - they provide an image that could use a little extra love, and everyone works their magic on it.  It's so fun to see how everyone does it differently (not to mention hugely educational!).

So here it is, this is my first Fix it Friday entry.  

The original shot:


My Fix:

1.  My process started in Lightroom for a fix of white balance, saturation, and blacks.

2.  Then to Photoshop Elements for a crop/straighten, blemish removal, eye sparkle, and noise removal.  Thought I was done, but upon further inspection it was...

3.  Back to Lightroom for another boost in blacks, an exposure and brightening tweak, and finally some vignetting. 

This was so FUN!  I'll definitely be doing this again!  Head on over to this week's Fix it Friday post to see what other "fixers" are doing.  Heck...join in too!  Let me know if you do so I can come see :) 


Read more...


  © Blogger template Shush by Ourblogtemplates.com 2009

Back to TOP